
(Upper Antelope Canyon)
Once I arrived in Page, I wandered around the local area taking a good deal of desert photographs. Near Page is the famous Horseshoe Bend which is a wonderful place to shoot at sunrise or sunset. It’s a 3/4 mile hike into the overlook that is seemingly up hill both ways. If you are afraid of heights, this definitely isn’t the place for you. But if you’re willing to forego that, it’s a wonderful view. The best shots are made right up against the edge of the cliff that has no guard rail or anything protecting you from the 1000’ drop off. It is a view that is worth the hike and heat for.


(Horseshoe Bend)
A day before my Upper Antelope tours were to happen, I got a last minute photographers tour in to Lower Antelope with Ken’s Tours. Entering the canyon is not for the faint of heart. It’s a super steep stairway down about 80 or so feet into the canyon. There was a seemingly unending line in front of us and behind us entering the canyon. Letting people pass us so that we could find a lull in traffic to photograph with tripods was aggravating but something that just has to be dealt with. Due to the fact there were so many people down there, our guides wound up giving us an extra half hour in the canyon to get the shots we really wanted.

(Lower Antelope Canyon)
Lower Antelope Canyon really requires a wide angle lens. I felt like I was missing a lot of good shots with my Nikkor 24-70mm f/2.8. I was really wishing I had a little more room to work with. That said, I was pretty happy with the images that came out of it. Due to the fact that the canyon is wide open at the top we had a lot of sunlight coming in but also had very dark shadows and in order to accomplish good shots I needed to bracket and merge my images into HDR with Photomatix. I shot in aperture priority and set it at f/8. That gave me pretty good focus all the way around while maintaining sharpness. After a lot of post production, I got some great images out of Lower Antelope.
(Rattlesnake Canyon)

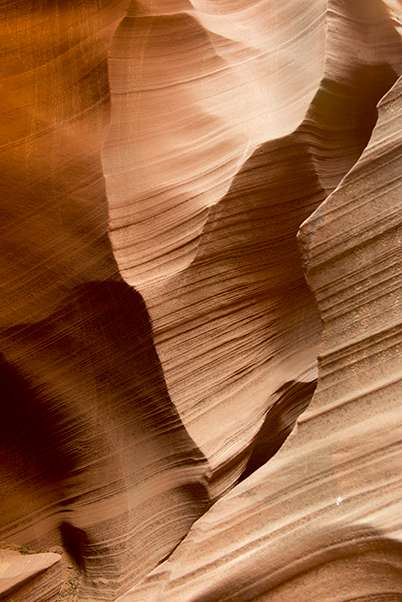
(Upper Antelope Canyon)
So here are my photo tips:
*BOOK THE PHOTO TOUR! Don’t try and do it on a walking tour!! Most - if not all - will not allow a tripod unless you’re on a photo tour. Book it WELL IN ADVANCE if you want a shot at one. I overheard more than one person saying they got in on a cancellation and that the next available photo tour wasn't available for months. Photo tours get priority in the canyons so make sure you book it months in advance.
*Bring your tripod. In many cases, they check that you have a DSLR and a tripod before even setting out on the photo tours.
*Use aperture priority and set it to f/8 or f/11.
*Use a low ISO (100-400) and take advantage of that tripod.
*Shoot RAW if you can! If you’re shooting in JPEG, set your white balance to ‘Cloudy’ to get the right colors inside the canyons.
*Bracket images! Especially in Lower Antelope with its highlights and shadows. In upper, you can get some interesting HDR images.
*Know how to effectively use your tripod and be able to manipulate it quickly.
*Know your camera’s settings inside and out. It can be the difference between getting an image or walking away unhappy.
*Bring extra batteries. Lots of long exposures will drain your battery quickly.
*Bring a remote shutter release!! That’ll make sure you get sharp images.
*Bring a blower or canned air and use it often. Sand is constantly being thrown into the air to light up the light shafts - it will end up on your lens and camera. Use it constantly.
*Look around! While you’re waiting for that light shaft, look up. Look left. Look right. Look behind you. There are so many shots to be had it’s ridiculous. I got so many great shots while waiting for others while the rest of the group was focused on waiting for “the” shot.
*In Upper Antelope, when they’re tossing the sand up in the air, wait for the sand to settle (After a few shovel fulls of sand they toss) and create a nice dusty light shaft. If you shoot right after they toss it, the highlights will definitely blow out.
*Leave your camera attached to your tripod and carry it while it’s mounted to it. Remember to close your tripod legs and move on to the next shot.
*Use your viewfinder and images to verify nobody is in your shot. It’s not hard to catch somebody in your shot as the canyons are very crowded. Let your tour guide know and he/she will make sure people move out.
*DO NOT try and change your lens in the canyon. The sand and dust flying around WILL get into your camera for sure.
*Leave your bag in the tour vehicle. It’s too tight in there to use it. I found the first time that I did bring it the only thing it was used for was carrying my water.
*Bring water! It’s hot out there! While it’s cooler in the canyons, it’s still rather warm.
Last but not least:
*TIP YOUR TOUR GUIDE! If they went out of their way to get you your shot, make sure you show them some love. Most of these guys and gals can tell you what settings to use and even help you with the composure of your shot. In some instances I even saw guides taking the photos for the customer themselves so that they walked away with a great image.


No comments:
Post a Comment